Pages

Wednesday 30 April 2014

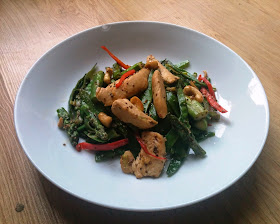
Clean & Lean - Chicken, Asparagus and Cashew Nut Stir-fry

On Saturday we scared ourselves by watching The Bitter Truth about Sugar on YouTube. On Sunday, after a bit of consideration, we decided it was time to clean up our diets a bit. We don't want to lose weight but we certainly want to feel better mentally and top up our energy levels.

After a quick bit of searching on amazon we came across the Clean & Lean Diet Book, written by James Duigan, which had fantastic reviews. Instead of supporting amazon we nipped down to Greenwich Waterstones and picked up a copy there.

For the past three days we've managed to abstain from the temptations of the birthday treats at work, alcohol and any other drink apart from water. We're not feeling too different yet, but we're certainly not feeling any worse so we'll keep on persevering!


Chicken, Asparagus and Cashew Nut Stir-fry from the Clean & Lean Diet book by James Duigan
Serves 2
1 skinless chicken breast, cut into 1cm strips
1.5 tablespoons vegetable oil
1 clove of garlic, crushed
25g cashew nuts
1 thin red chilie, thinly sliced
3 spring onions, sliced
125g asparagus, cut into small chunks
125g mangetout, cut length-ways
40ml chicken stock
1 tablespoon chia seeds (Hollands & Barratt sell these)

  1. Heat half the oil in a wok over a high heat. Add the chicken, cashew nuts and garlic and stir for 3-4 minutes until the chicken is nearly cooked and the cashews are lightly toasted. Tip into a bowl.
  2. Add the other half of the oil and throw in you chillie, spring onions, asparagus and mangetout. Stir for 2 minutes. Add the stock and cook for another 2 minutes. The stock will mostly evaporate.
  3. Add the chicken and cashew mix back into the wok for a final couple of minutes to warm back through. Stir in your chia seeds and add a squeeze of lime if you fancy. 

Wednesday 23 April 2014

RAWR - Dinosaur Cut Out Sugar Cookies

Having recently moved to a new area the first thing I did was check out the high street, I was delighted to find a cookware shop (my purse cried). Luckily I managed to restrain myself and only came out with this cute dinosaur cookie cutter. I like to think this is a diplodocus as this was always my favourite dinosaur...I like it's name. Of course once armed with a new cookie cutter a batch of cookies have to be made!

I never can figure out if I should call these biscuits or cookies. Cookies to me are large, soft, chewy discs of goodness whilst biscuits are smaller, crunchier and can be cut out using a cutter.


Regardless of how you define a cookie or a biscuit these are tasty and slightly soft, the royal icing gives them a nice satisfying crunch. Not bad for such a simple recipe, all you need is a little extra time to leave the dough to chill.

For the cookie:
1/2 cup butter
3/4 cup sugar
1 egg
1 teaspoon vanilla extract
1.5 cups plain flour
1/4 teaspoon baking powder
1/4 teaspoon salt

For the icing:
250g royal icing
40ml cold water
small squirt of green gel food colouring


  1. Using a stand mixer, or a bit of brute force with a wooden spoon, cream the butter for a couple of minutes until it is smooth. Add the sugar to the bowl and beat again until it is nice and fluffy. 
  2. Add the egg (don't worry if it curdles - keep beating) and then add the vanilla extract.
  3. Add the flour, baking powder and salt and mix until it is just combined. 
  4. Pop onto a piece of cling film and press down to form a rough circle, wrap it all up in cling film and leave it in the fridge for about an hour. This is essential so don't be tempted to skip it!
  5. Preheat your oven to 180c and line two baking trays with grease-proof paper.
  6.  Remove the dough from the fridge and put half the dough on a piece of grease-proof paper, cover it with another piece of grease-proof paper and then roll it out with a rolling pin until it's about 1cm thick.
  7. Use a cutter to press down on the dough and then transfer the shapes to your baking trays. Put the baking trays in the fridge for another 15 minutes. This is to chill it out again so the cookies keep their shape when they are cooked. 
  8. Remove from the fridge and bake for about 10 minutes until they are a very pale golden colour.  They will become crispier as they cool so don't worry if they're soft when you first remove them. Leave to cool on a wire rack.
  9. Whilst cooling whisk together the royal icing and water for 5 minutes until it forms peaks, then add the food gel colouring. Using a piping bag (I use a disposable one) trace the outline of your shape.
  10. Dilute some of the icing using a bit more water and use a teaspoon to place it within the outline, use the back of the spoon to spread your icing right up to your outline.

Saturday 12 April 2014

The best American Pancakes

Despite being British through and through there is something irresistible about a stack of thick, fluffy American pancakes. Although we still love the thinner, crepe-like, British pancakes they don't quite cut the mustard for a lazy Saturday morning.

Over the last year or so we've become almost experts in American Pancakes and have tried numerous recipes from Nigella Lawson to community recipes in forums. This recipe, hands down, is the best we've come across yet.

As we've done all this experimenting we treated ourselves to a special pancake pan which really has been an awesome investment - no more greasing scratched frying pans for us!

Ingredients:
2 cups of plain flour
3 tablespoons of sugar
1 tablespoon of baking powder
1/4 teaspoon salt
1.5  cups of milk
2 eggs
1/4 cup of melted butter

1. Put all of the dry ingredients into a bowl and combine

2. In a separate small bowl whisk together the milk, eggs and melted butter
3. Add the wet ingredients to the dry and mix until just combined. The batter will be lumpy - leave it like this! Wait 10 minutes before proceeding any further. Trust me, this step is important - it lets the flour fully hydrate and is key to the lovely texture.
4. Finally it's time to get cooking! Heat up your pan over a medium heat, it sometimes take a couple of pancakes to find the right heat. Pour about 1/3 cup of mixture into the pan and wait until little bubbles start to form.
5. Flip the pancake over and cook it for about a further minute on the other side.
6. Continue this until you're all out of batter! They taste best fresh out of the pan so we often just gobble them up as soon as they're ready. In terms of toppings the world is your oyster - from maple syrup to chocolate spread it all tastes great.

Sunday 6 April 2014

Sunday Seeded Bread

Every Sunday, without fail, I bake a loaf of seeded bread. Sometimes I bake two. It all depends on whether we can resist wolfing down the freshly baked loaf as soon as it comes out of the oven.

Our favourite loaf of bread, without doubt, is made with Sainsbury's Taste the Difference Wholegrain Seeded Flour. Although it's slightly pricier than your average bread flour (£1.10 bag makes 2 loaves) it's much more filling and satisfying to eat as it contains sunflower seeds, pumpkin seeds and linseeds.

This is a really basic recipe but it makes for such a tasty loaf and it never fails to impress me that a handful of such simple ingredients can create such a wonderful smell throughout the entire house. Bread making is certainly a type of magic in my eyes!

Ingredients:
500g seeded flour
1 tablespoon dried yeast
1 teaspoon salt
25g butter
300ml tepid water
Small amount of olive oil for greasing bowl

1. Put the flour, yeast, salt and butter into a bowl. Ensure that the yeast and salt are at opposite ends of the bowl. Using your fingertips rub the butter into the mixture until it is all rubbed in.


2. Place your bowl on the KitchenAid fitted with a dough hook. Turn it onto a low speed and slowly add the water. Continue until the bowl is clean of flour and you have a rough looking dough.
OR
Slowly add the water and begin to bring the dough together with your hands. Continue to add the water until the sides of the bowl are clean and you have a rough dough.
3. Turn the speed up to medium for about 7 minutes. Keep an eye on it though as the dough will 'creep' up the sides of the bowl and not be kneaded by the dough hook - just stop for a second and push it back down. After 7 minutes check that you have a soft and elastic dough.
OR
Turn out your dough onto a clean surface that you have lightly covered in olive oil, this prevents you adding more flour to the mix and drying out the dough. Knead for around 10 minutes until you have a soft and elastic dough. 
4. Form into a ball and place it in a lightly oiled bowl. Cover with a damp tea towel or a piece of cling film that you have oiled. Leave it to prove somewhere warm for at least an hour, until it has doubled in size.
5. Tip your dough out and knock the air out of it by pushing down. Knead for about 30 seconds and then form a rough oblong and place it in a loaf tin.
6. Again, cover and leave to rise for approximately 30 minutes. Meanwhile preheat your oven up to 220c.
 7. Finally place your beautiful loaf of bread in the oven for 30 minutes. You want a nice deep coloured crust on your loaf. Remove from the oven and tip it out of its tin. Tap the bottom of the loaf, you want to hear a hollow sound, to check that the loaf is cooked. Leave to cool for as long as you can resist!