Wednesday, 30 July 2014

Beetroot Brownies

15:00 Posted by Anna , , No comments
Now, I'm not a huge fan of beetroot so why I decided to grow it in the garden I'm not quite sure. However, here we are at harvest time and I've got more beetroot than I need and I want my land back to begin planting new crops. Instead of pickling it all I decided to go on a bit of a hunt for something else to do with it all...I ended up finding this Beetroot Brownie recipe on BBC Good Food.

Given that it had mixed reviews I decided to half the mixture - I didn't want to use my entire patch of beetroot in one go! I have to say although they are slightly different I find them pretty tasty, especially considering they contain much less fat than your average brownie.

Ingredients:

  • 200g of uncooked beetroot (after being peeled)
  • 50g unsalted butter, cubed
  • 100g dark chocolate, roughly chopped
  • 125g caster sugar
  • 2 small eggs
  • 50g flour
  • 15g cocoa powder
Method:
  1. If required, peel your beetroot. Preheat your oven to 180c.
    Fresh from the garden!
  2. Chop the beetroot into smallish chunks and place into a microwaveable bowl. Add a small amount of water, about a teaspoon, cover it in cling film and zap it in the microwave for about 10 minutes. It should be tender, drain it in a sieve.
  3. Add the chocolate and butter to the bowl of a food processor. Add the beetroot to the ingredients and whizz away. The heat from the beetroot should melt the butter and chocolate. Keep on whizzing until it's as smooth as possible.
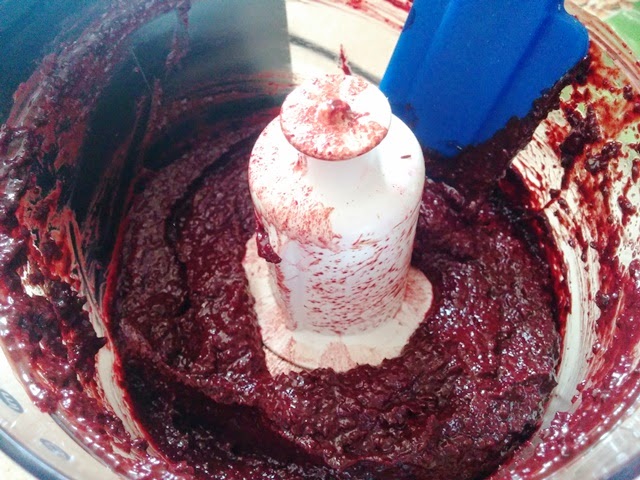
    Looks yummy (?!)
  4. In another bowl use an electric whisk to combine the sugar and eggs, you want it nice and foamy so do it for a few minutes. 
  5. Add the beetroot mix to the egg mixture and gently fold it in using a figure of eight motion.
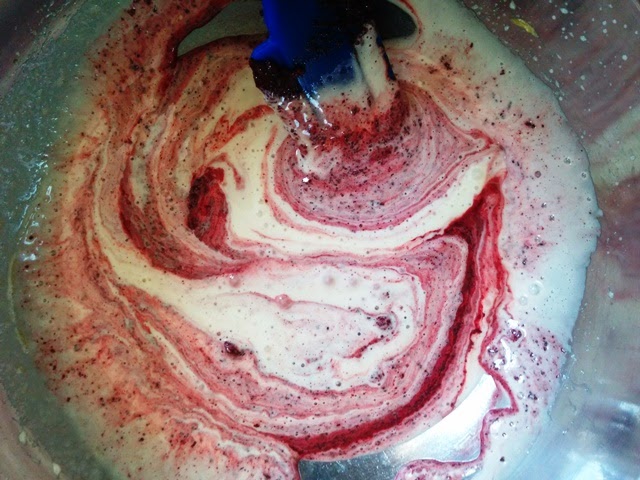
  6. Finally sieve in the flour and cocoa powder and fold in before pouring into your greased tin.
  7. Cook for around 20 minutes, check on it after 15, until it has a thin crust but still has a hint of a wobble in it.
  8. Leave to cool in the tray before cutting and serving.

Sunday, 27 July 2014

Murgh Makhani/Butter Chicken

At the end of May this year we went in India, we spent a few days in Mumbai before heading south, by train, to Ratnigiri for a couple of days and then finally headed further south to Goa. It was a great experience filled with even greater food, in particular some seriously good butter chicken.

Even made the naan myself too!
On returning home, armed with a butter chicken blend of spices from Mumbai and Rick Stein's India cookbook I had to give this a go. The recipe is taken from his book. Where he has put spices I used the spice blend I picked up in Mumbai then tweaked it at the end by adding a little bit of the spices I thought it needed.

Ingredients:
  • 4 large chicken breasts, chopped into large chunks
First Marinade
  • Juice of 2 limes
  • 1tsp Chilli powder (as hot or as mild as you like)
  • 1 tsp Salt
Second Marinade
  • 50g natural yogurt
  • 50g double cream
  • 4 garlic cloves, roughly chopped
  • 5cm ginger, roughly chopped
  • 1tsp Garam Masala
  • 1 tsp turmeric
  • 3/4 tsp ground cumin
The sauce
  • 50g ghee (I used butter)
  • 5 crushed garlic cloves
  • 5cm ginger, grated
  • 400g carton of passata
  • 1/2 tsp chili powder
  • 1/2 tsp ground coriander
  • 1/2 tsp ground cumin
  • 1/2 tsp ground cinnamon
  • 1/2 tsp Garam Masala
  • 1 tsp desiccated coconut
  • 1 1/2 tsp salt
  • 200ml water
  • 25g cashew nuts
  • 25g pumpkin seeds
  • 2 tbsp boiling water
  • 1 tbsp dried fenugreek leaves
  • 1/2 teaspoon caster sugar
  • 45ml double cream
Method:
  1. Put the lime juice, chili powder and salt into a bowl. Add the chicken and toss until coated. Cover with cling film and leave to marinade for an hour in the fridge.
  2. Add all the ingredients for the second marinade into a food processor and whizz up until it is smooth. Add this to the chicken and ensure every piece is thoroughly coated. Cover with cling film again and leave to marinade for another 4 hours.
  3. Preheat the oven to 240c (this is hotter than some ovens allow, in that case just crank it up as high as it will go). Get a wire rack, I used a cooling rack, and suspend it over a baking sheet. Lay your chicken pieces on top of this and cook in the over for 15 - 20 minutes. You want the chicken to be lightly charred but not completely cooked as it's still got to be cooked in the sauce.
  4. Melt the ghee/butter in a large, heavy-based, saucepan and fry the garlic and ginger for a minute, add the passata and simmer for 5 minutes.
  5. Add the spices, coconut, salt and 100ml of water and simmer for another 10 minutes. After this your chicken should be ready to remove from the oven.
  6. Whilst the sauce is cooking blend the cashew nuts, pumpkin seeds and 2 tablespoons of boiling water in a food processor until it's as smooth as you can get it - place to one side as you'll need it in a moment!
  7. Add the chicken, 100ml of water and your cashew and pumpkin paste and simmer for a final 10 minutes. Finish with the fenugreek leaves, sugar and cream.
  8. Serve with a handful of coriander leave and some shredded ginger, if you fancy it.

Tuesday, 22 July 2014

Triple Chocolate Chunk Cookies

Us Brits aren't so good at cookies, we're just not used to them. Biscuits are more of our thing, which I guess are just harder, crunchier cookies. Cookies are quite new to us, they are chewy, soft and tend to need to be purchased from Millie's, Subway or more recently supermarket bakery sections to get a decent one. Not anymore though...

After several experiments, most ending in near-biscuits rather than chewy cookies, I'm happy that I've finally mastered the art of cooking proper cookies. The experiments have revealed several learning points:

  1. Use a mix of brown sugar and white sugar to get the right chewy:crispy ratio
  2. Don't overcook them - it's tempting too, especially when you prod them and they are super soft, just leave them to cool on the baking tray for a little while before transferring to a wire rack
  3. Try and use the same measurement to dollop the mix onto the baking tray to ensure evenly sized, round, cookies.
Ingredients (makes 12):
  • 100g Dark Brown Sugar
  • 50g Caster Sugar
  • 85g Melted Butter
  • 1 egg
  • 1/2 teaspoon vanilla essence
  • 125g Plain Flour
  • 1/4 teaspoon of bicarbonate of soda
  • 1/4 teaspoon of salt
  • 150g chopped chocolate (50g each of milk, dark, white)
  1. Preheat the oven to 180c and line two baking sheets
  2. In a large bowl mix together the sugars and melted butter until well combined.
  3. Add the egg and vanilla essence and mix well.
  4. Sift the dry ingredients into the bowl and stir in, once combined pour in the chopped chocolate and stir until coated.
  5. Using a tablespoon and a teaspoon scoop the mixture onto the baking trays, six to a sheet.
  6. Pop into the oven for 10-15 minutes, checking regularly, you want them just to be slightly crisp on the edges.
  7. Leave to cool for 5 minutes on the baking tray and then transfer onto a wire rack to cool/gobble up!


Friday, 20 June 2014

Delicious Danish Pastries!

Danish pastries have always been a favourite of mine when browsing the bakery aisle in the local supermarkets - always a dangerous location if you've not had breakfast! Finally, last weekend, I decided to give it my own go. If you want to do the same make sure you give yourself plenty of time, this isn't a quick bake!

I used Paul Hollywood's recipe which you can find here.

Ingredients:

  • 500g strong white bread flour
  • 80g caster sugar 
  • 10g salt 
  • 10g instant yeast 
  • 2 medium eggs 
  • 90ml cool water 
  • 125ml lukewarm (not hot) full-fat milk 
  • 250g chilled unsalted butter (use a high quality butter)
  1. In your mixer bowl add the flour, sugar, salt and yeast - ensuring that the yeast and salt don't touch. Then add in the eggs, water and milk and begin to mix on a medium speed until combined (about 2 minutes) then increase to high speed for 6-7 minutes.
  2. Shape into a ball, dust very lightly with flour and either pop into a clean plastic bag or wrap loosely in cling film to allow it to raise. Pop it into the fridge for an hour.
    High quality french butter is what you need!
  3. Roll out the dough to a rectangle 50cm x 20cm. Bash the butter between two pieces of cling film until it is 33cm x 19cm. Then place the butter on top of your rolled out dough. Fold the dough with no butter on over the top of the butter. This should leave some butter exposed. Cut off this exposed butter and place it on top of the dough that you've just folded across. Then fold the remaining bit of dough (that used to have the butter on) on top of the butter. Seal around the butter and place in the fridge for an hour.
  4. Remove from the fridge and roll out to 50cm by 20cm again. Again, fold over a third of the dough and fold the remaining third back over the dough. Put back into the fridge for an hour. Repeat this twice more.
  5. Once this is finished leave it in the fridge for 8 hours/overnight. It is then ready to use and can be used in a range of different danish pastries. You can see my dough raised a little more than hoped but you can see lots of layers!
  6. Preheat your oven to 200c.
  7. I rolled out half my dough to 45cm x 15cm and cut into 7.5 squares and formed them into pinwheels - this is video is the simplest to show the technique. I then popped a dollop of creme patisserie on top and a raspberry before coating it in an egg wash.
  8. Bake for 15 - 20 minutes until a beautiful golden brown colour. I used the remainder of the dough to make lemon and lime pastries, chocolate pinwheels and pain au chocolats.

Tuesday, 17 June 2014

Tangy Hummingbird Bakery Lemon Bars

Living and working in London, I'm lucky enough to be able to walk to one of the Hummingbird Bakery's in my lunch hour. Despite this I've only been in once and even then I didn't buy something for myself; instead I opted for a slice of cake to gift to a friend. This is partly because I can't bring myself to spent upwards of £3 on something I can cook myself and partly because I've got the Hummingbird Bakery cookbook at home.

I can't say I've been bowled over by their book some of the recipes (chocolate cheesecake) are amazing but others have left me feeling really disappointed, but not as disappointed as I would have been if I'd paid £30 for the cake! Given this, it was a bit of a gamble when I decide to make lemon bars and opted for the Hummingbird Bakery Recipe - there are a few things I'd tweak next time; less biscuit, more topping but overall they turned out tangy and gooey.

Ingredients:

Base

  • 290g plain flour
  • 70g icing sugar (plus extra for dusting)
  • pinch of salt
  • zest from 2 lemons
  • 230g unsalted butter
Topping
  • 210g caster sugar
  • 100ml lemon juice
  • zest from 3 lemons
  • 3 eggs
  1. First of all line and grease your tin and preheat your oven to 170c.
  2. Put all the ingredients for the base in a large bowl, using the paddle attachment (or your hands) mix until it begins to all stick together.
  3. Push the base ingredients into the tin and smooth over to form an even layer. Pop into the oven for about 20-25 minutes until it is pale golden.
  4. Remove it from the oven and leave to cool for around 15 minutes (leave your oven on). Meanwhile put all the ingredients for the topping in a large bowl and whisk until all incorporated fully.
  5. Pour the the topping on top of the biscuit base and put it back in the oven for another 20 minutes until it's slightly brown around the edges. 
  6. Remove and leave to cool before refrigerating them overnight - sadly patience is required!
  7. Dust with icing sugar and cut into slices to serve.


Friday, 13 June 2014

Turkey and Dill Meatballs

06:00 Posted by Anna , , , , No comments


The Book People come into my workplace one every month or so and although they don't bring a massive range of book with them they always have some decent cookery books. Since we are trying to be Clean & Lean (apart from when we're stuffing our faces with teacakes) The Superfood Diet book caught my eye so I went for it.

The book is lovely with plenty of great recipes and photographs so I'd recommend it. This is the first recipe we've made from it so far and it's great - just don't expect it to taste like your regular meatballs! The only thing odd is that this recipe says it make 15 meatballs but unless you're after balls the size of your face you can make them much smaller and I managed to get 24 meatballs, two nights worth of dinner.

Ingredients:

  • 500g turkey mince
  • 1 chopped medium onion
  • 1 egg
  • 2 tablespoons of chopped dill
  • 100g sushi rice, cooked and chilled
  • 500ml Pasata
  • 2 Garlic Cloves, chopped
  • 1 teaspoon oil
  • Salt and Pepper to season
  1. Preheat the oven to 200c
  2. Put the mince, onion, egg, dill, seasoning and sushi rice into a large bowl and mix together using your hands - don't be shy.
  3. Roll into 24 meatballs and place into two casserole dishes. Cover one with cling film and leave in the fridge for the next evening. 

  4. Heat the oil in a saucepan and add the garlic, fry until light brown.
  5. Add the passata and bring to a simmer, season to taste.
  6. Pour half of the tomato mix on top of the meatballs and place into the oven for 45 minutes. Decant the other half into a container for the following day.
  7. Remove from oven, serve up over wholemeal pasta.

Wednesday, 11 June 2014

Chocolate Marshmallow Teacakes


Lakeland recently had a 40% sale on bakeware, much to my delight. I've being eyeing up a few things in the store and after 15 minutes of being indecisive I finally settled on the Chocolate Teacake Mould. Given my love of making marshmallows it really should have been an obvious choice.

You'll notice throughout the recipe that I've cheated in some places (I didn't make my own biscuits), but it is possible to make these completely from scratch if you've got a whole afternoon to spare.

Ingredients:

  • 300g chocolate - I used a mix of Bournville & Dairy Milk
  • 6 chocolate digestives (normal digestives are too big)
  • 3 egg whites
  • 100g caster sugar
  • 1 tablespoon golden syrup
  • 0.5 teaspoon vanilla extract
  1. In a microwave melt 200g of the chocolate - zap it in short bursts of 15 seconds, stirring in between, as it's easy to burn. Leave it to cool a little before using.
  2. Use about half of the melted chocolate to coat the chocolate digestives.
  3. Spoon about a tablespoon of chocolate into each mould and spread it up the sides - try to keep it of even thickness and ensure all the mould is covered.
  4. Over a pan of simmering water place a mixing bowl with the egg whites, sugar, golden syrup and vanilla extract in. Use an electric whisk for 5-10 minutes over the heat until the marshmallow mixture becomes thick and gloss, the whisks should leave a trail and the mix form stiff peaks. Leave to cool.
  5. Spoon the marshmallow mix into the moulds but leave enough space to place the biscuits on top. 
  6. Melt the remaining 100g of chocolate and spoon it into a piping bag. Leave it to cool for just a few minutes.
  7. Pipe a small amount of chocolate around the biscuit and the top of the mould and then sandwich the biscuit on top of the marshmallow.
  8. Leave to set before slowly peeling the silicon mould off, then enjoy!